24/02/2011

DL link

This is a temp link to my files submitted on the disk incase the disk is not working.
http://rapidshare.com/files/449720429/3DmodellingAssignment1.7z

Final

Renders + Thoughts

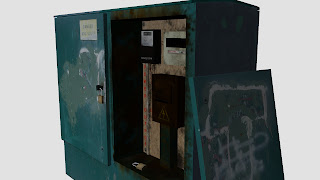
Renders of my electricity box asset.
I'm pleased with how the final model looks. I think it's good for what it is. I enjoyed the process of taking photographs to use as texture for my model. Really helps bring the model to life. I'm happy with the interior of the electricity box too, having not access to what is in the original box inside. I used images sourced online to help give ideas to me as to what possibly could be inside. Then I created my own versions in Photoshop complete with wear and tear look, to give it a more authentic feel.

Final Model Screens


A selection of screenshots showng my final asset model.

Front


                                                                              Back


Close up of interior

Asset Screenshots Part 2

Here are some screenshots showing my improved asset model.
As you can see I have placed the three components (meter box, fuse box and power box) inside the cabinet. I have also added some wires and tubes going to each component.
I added an edge to the top of the electricty box to give the model more definition. Also not shown, but on the back I added more detail by placing a panel box on the bottom too. Once again this helps give more life-like feel to the asset.


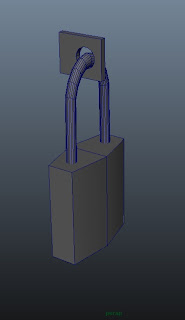
Here is a close up of the padlock. I used a polygon cylinder for the clip of the lock. I also used boolean to cut a hole on the padlock holder.

Texture Maps

These textures were created in Photoshop. I used reference images I had taken with my camera as well as brushes.


This texture done completely in PS with using brushes and multiple layers with the smudge tool as well.
This power box was created to look rusty and very old. I used a font to get the electricity warning sign. Again the smudge tool in PS was used to get the running stains effect. The front panel also has a bump map displaying the volatge of the the power box.
All of the padlock was created from scratch in PS apart from the the key slot at the bottom, which was sourced from online. I added a bump map for the lettering on the lock.


For the meter I created the entire front panel with numbers in PS. I couldn't find the desired looking front I wanted. I think it looks really good and realistic myself.


This is the main shell of the cabinet/box. All sourcxed from the photographs I took in Markeaton Park. I added my own rust and damage wear for the interior panels where the components sit using PS.


I added some writing to the fuse box to give it a sense of use. Not just sat there doing nothing. Also I used a bump map for the outline of the door on the front. Again using brushes to get that speckeled dirt effect.

UV maps


Doors

This is just one map for the four doors.


Box/Cabinet


Fuse
The fuse texture along with the meter and power components will be created from scratch in Photoshop using brushes and blending techniques. I will get ideas from the collected reference materials though. I'd use some other images I had taken to also enhance the wear of the items. 


Meter


Power


Padlock


18/02/2011

Asset Modification

I've modified a couple of the instruments this past week. Just to get some more detail going in the asset.

Modified power box.

Modified meter.


10/02/2011

Asset Screenshots

Here are a ffew screenshots I took of the asset I'm going to be modelling in Maya.
Box
This is the actual box, as you can see one of the doors is missing off the front. This is so I can add more detail to the box.

 Instruments
These are the instruments (meter, fuse box etc.) that are visible inside the box where the door is off.


 Door padlock
This is one of the padlocks that will be visible on all thre doors of the box.

Asset Reference

Here are some of the reference photographs I took to help with modelling and texturing my asset.
I went out and took some more photographs which I may possibly use as texture for my asset. These may well be useful when texturing the inside of the box.
More reference material for when modelling and texturing the inside of the box.

Because I don't know what inside the power box is like, I'm using references of smaller scale boxes instead. My models will be based on these hopefully.

Asset Biography

Electricity Power Box


The asset I'm looking at creating is an electricity power box. This asset is being created to be placed in an alleyway daytime scene, 
found in a FPS game called "Riot".


The alley way scene is one particular level, located in a present day city in England, over crowded by protestors. The streets are littered with people trying to run the old government out of the country. The player controls a riot officer trying to fend off the attacking protestors.


The asset will be an objective in the level as the user will have to go up to the electricity box and activate a switch. Because of this interaction, the asset will have to be detailed when looking up close. The aset will be in worn condition in general. Then perhaps graffitti on it or other damage to reflect the destructiveness of the protestors found in the game.